Twincat OPC UA Configurator |How to Establish OPC UA Communication in TwinCAT 3 ?Complete Step-by-Step Guide!
1 OPC Server
1.1 Installation of the OPC server
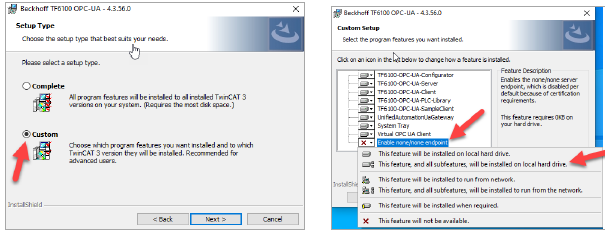
Installing the OPC Server and setting up a Connectivity project is generally described in the document Beckhoff. TF6100: TwinCAT 3 ¦ OPC UA. However, in contrast to the default installation, it makes sense to add an unencrypted connection to the server for easier usage during development.
- Choose “Custom” as Setup Type
- Enable none/none endpoint with all its sub features
1.2 Configuration of the OPC server
1.2.1 OPC server initialization and Administrator account
Once the OPC Server is installed, an administrator account must be made, including a password, to be able to create future configurations.
Running the TcOpcUaConfigurator (C:\TwinCAT\Functions\TF6100-OPC-
UA\Win32\Configurator) as administrator will enable us to define user and password for the first time.
On the Configurator, a server connection can be enabled to connect the server for the first time, this can be achieved by trying to connect through an Anonymous Identity:
1. Edit
2. Get Endpoints
3. Select Basic – SignAndEncrypt endpoint
4. Add
5. Select Anonymous Identity token
After this selection, if we try to connect to the server, a window with Username and password prompts appears, and we can create the Administrator account.
The next time we want to access the server, this account must be used.
1.2.2 Anonymous access and none-none connection
For the configuration of the server, Configurator is still used until Anonymous access is enabled. Edit the server connection, now with the Administrator account:
Additionally, for the Server Settings section: make sure that “Allow deprecated security policies” and “Automatically trust all client certificates” are enabled, and the “none” security policy is added
If the configuration is done successfully, then we can access the server with a none-none security mode, and an anonymous user, which enables automatic access to external sources, such as TC3 software and HHU.
1.2.3 Server login on TC3
After creating a connectivity project in the solution explorer (described in Beckhoff. TF6100: TwinCAT 3 ¦ OPC UA, chapter “Configurator” starting with page 101) it can be connected to an OPC server. To be able to choose a server, it has to be added to the dropdown list. Use “Add Target OPC-UA Server” to choose the server.
Add the OPC toolbar:
- Edit Serverlist
- Add Server
- Enter URL of the target system
- Select [None, None] endpoint.
- Anonymous endpoint
- Press “Ok”
- OK
- Choose the new added server in the dropdown list
- Select one of the available endpoints.
- Press “Connect”
If the server is configured from scratch, select “yes”
If, instead, a server configuration is already loaded on the solution, and will only be activated on target, select “no”
1.2.5 TMC file update for OPC access
Once the data access has been loaded, TMC file must be enabled as a target file for OPC server to have access to selected variables, and consequently every client can see and edit variables on the server accordingly.
1.3 Reinstalling and recovering the OPC server.
If the need for reinstalling the server, either for losing the Administrator account, or for server malfunction, some steps might be needed for a complete server reset:
First, every software regarding the server must be uninstalled, including the gateway:
Once the programs have been uninstalled, the folder containing the former server configurations must be erased, or else a new server, with its corresponding users and configurations, cannot be created.


