- Get link
- X
- Other Apps
Example: How to Modify the IP Address of an S7-1500 via the Display Panel?
We'll demonstrate how to modify the IP address of an S7-1500 CPU using the display panel.
First, set the CPU to the STOP mode. Here's how:
- Press the right arrow to navigate to the "Settings" menu, then press "OK" to enter.
Navigate to the "Run/Stop" menu and press "OK" to enter.
The system will prompt you to confirm whether you really want to set the CPU to "STOP" mode. Click "OK" to confirm.


At this point, the CPU enters the STOP mode.

Next, let's proceed to modify the CPU's IP address.
- Press the right arrow button to navigate to the "Setting" menu, then press the "OK" button to enter the menu.
- Navigate to the "Address" menu and press "OK" to enter.
- Select the "X1" menu and press "OK" to enter.
In the "X1" menu, locate the "IP address" option in the list, then press "OK" to select the submenu.
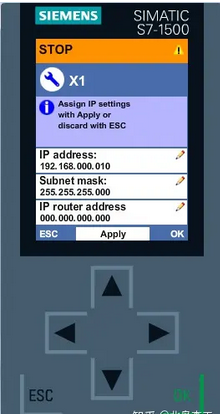
Press "OK" again to enter the edit mode of the "IP Address" menu. Use the directional arrows to set the desired value, for example, "192.168.0.10", as shown in the image below:
The same method can be used to set the subnet mask.
Once all settings are complete, click on "Apply" to apply the changes and make them effective.
The system will prompt that the settings have been applied successfully, as shown in the image below:


Practical Tip: How to Quickly Configure SIMATIC S7-1500 PLC?
Hardware configuration is the first step in programming the SIMATIC S7-1500 series PLC. Typically, programmers and debuggers would add the CPU and various modules on the rack based on electrical diagrams and the physical PLC. If there are many modules on the rack, it may take a considerable amount of time. I'd like to share a little trick that allows for quick configuration of the CPU and signal modules on the rack.
Firstly, open the TIA Portal development environment and create a new project. In the new project, double-click on the "Add new device" option in the left navigation bar. In the dialog box that appears, click on "Controller" - "SIMATIC S7-1500" - "CPU." Instead of selecting a specific CPU model, choose "Unspecified CPU 1500," as shown in the image below:


At this point, below the hardware configuration of the project, there is a prompt indicating that the CPU model has not been specified. You can either select a specific CPU from the hardware catalog or detect the currently connected devices. The latter is the technique we're going to introduce.
Firstly, connect the computer running TIA Portal and the CPU of the device currently being configured using an Ethernet cable. Then, click on "Detect." TIA Portal will automatically switch to the network search interface, as shown in the image below:


Select the CPU you want to configure, then click on "Detect." You will find that the selected CPU and all modules on the rack are automatically added to the hardware configuration of the current project, as shown in the image below:

- Get link
- X
- Other Apps