Beckhoff PLC utilizes EtherCAT real-time Ethernet, and its configuration method for sub-stations differs from Siemens'. For Siemens PLC, whether it's PROFIBUS-DP or PROFINET, distributed I/O sub-stations require hardware configuration and downloading to the CPU before completing the setup. In comparison, configuring Beckhoff EtherCAT sub-stations is simpler, requiring only scanning to obtain the configuration information. Let's delve into the details.
Prerequisites:
- Beckhoff controller (e.g., CX5020) is connected to EtherCAT sub-stations and the programming computer via Ethernet cable, with IP addresses in the same subnet.
- If using third-party EtherCAT sub-stations, their device description files (.xml) should be copied to the path: C:\TwinCAT\3.1\Config\Io\EtherCAT
Before scanning EtherCAT sub-stations, we first need to connect to the target controller.
Launch TwinCAT3, create a new TwinCAT project named IO_Scan. Double-click "System" in the project list, then click "Choose Target" in the pop-up window, as shown in the image below:
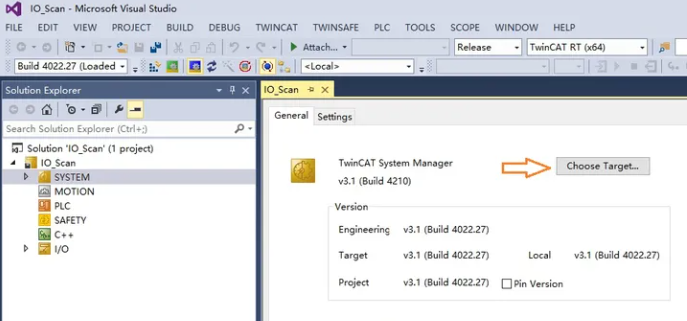
In the pop-up dialog box, select the target controller (if not listed, click "Search Ethernet" to search within the network scope), as shown in the following image:

Click "OK" to activate the configuration in the pop-up dialog box, completing the search for the target controller.
In essence, Beckhoff controllers have two modes: one is called "Run Mode," and the other is called "Config Mode." In Run Mode, the controller executes user programs and cannot modify configurations (such as scanning I/O). Scanning EtherCAT sub-stations can only be done in Config Mode. There are two methods to identify the current mode of the controller:
- Observe the TC indicator lights on the controller.
- Judge by the color of the icon in the bottom right corner of the TwinCAT3 programming development environment.
Whether it's the LED lights or the icon in the programming development environment, green indicates Run Mode, while blue indicates Config Mode, as shown in the image below:

If the controller is currently in Run Mode, click the Config Mode button on the toolbar first (numbered ① in the image below) to switch it to Config Mode.

Additionally, in the image, the button numbered ② is for switching to Run Mode, while the button numbered ③ is for switching to Free Run Mode, which we'll use later for hardware testing.
Once the target controller is switched to Config Mode, right-click under "I/O" → "Devices" in the left project tree, and select "Scan" from the pop-up dialog box, as shown in the image below:

The system will prompt "Not all types of devices can be found automatically." Click the "OK" button to continue.
In the pop-up dialog box, check the EtherCAT Master, as shown in the image below

The system will prompt whether to scan for sub-stations (Scan for boxes?).

Click "Yes" to continue. After the scan is complete, you will be prompted whether to activate Free Run mode. Free Run mode allows you to test hardware without a program, such as enabling output modules to produce output. Choose "Yes" or "No" based on your actual needs. If you choose "No" but later decide to perform Free Run testing, you can use the toolbar menu button numbered ③ to enter this mode. In Free Run mode, the icon in the bottom right corner of TwinCAT will flash alternately in red and blue.
The image below shows the EtherCAT I/O substation (Box1) that I scanned:

In Free Run mode, you can select any output channel of the output module and set its value to 1 to check if the hardware is functioning correctly, as shown in the image below:

The introduction on how to scan EtherCAT I/O sub-stations and perform hardware testing using Free Run mode for Beckhoff PLC ends here.